GMaps.js 사용 방법
GMaps는 Google지도를 사용하여 사용자에게지도를 표시하기가 매우 쉬운 자바 스크립트 플러그인입니다. 지도, 길 찾기, 정보 상자 등에 대한 포인터를 쉽게 추가 할 수있는 여러 옵션이 있습니다. 이 플러그인은 방대한 옵션이 많기 때문에이 튜토리얼에서는 모든 옵션을 다루지는 않습니다.
가장 많이 사용할 옵션 위주로 다루어 봅니다. 이 플러그인에 대한 모든 옵션을 보려면 Github Repository에서 설명서를 볼 수 있습니다. 문서 GMap.js를 사용하려면 Github에서 최신 버전을 다운로드해야합니다. GMap 다운로드 최신 버전이 나오면 헤드 태그 안에 페이지에 Javascript 파일과 jQuery가 포함됩니다.
<html>
<head>
<script src="http://ajax.googleapis.com/ajax/libs/jquery/1.7/jquery.min.js"></script>
<script type="text/javascript" src="http://maps.google.com/maps/api/js?sensor=true"></script>
<script src="gmaps.js"></script>
</head>
<body>

</body>
</html>
gmap.js를 페이지에 추가하면 GMaps라는 자바 스크립트 객체가 생성되어지도를 만드는 데 사용됩니다.
$(document).ready(function(){
 var map = new GMaps({
    el: '#map',
    lat: 51.5073346,
    lng: -0.1276831,
  });
});
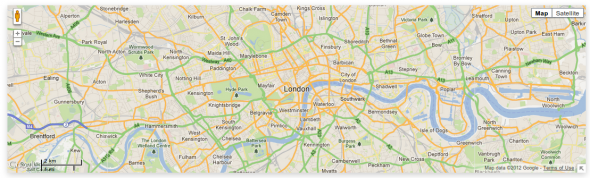
기초 지도
이 예제에서는 div 내부의 기본 맵이 됩니다. GMaps.js를 사용하는 가장 쉬운 방법은 페이지에서 약간의 자바 스크립트와 div입니다. 먼저 위와 같이 페이지에 GMap Javascript 파일을 추가하고 HTML div를 만듭니다.
<div id="basic_map"></div>
이제 자바 스크립트를 만들어 페이지에 기본지도를 추가 할 수 있습니다. 이 지도에서는 런던을 표시하도록 지도 중앙을 설정합니다. 줌 컨트롤, 스트리트 뷰, 오버레이 설정 등을 포함하는 다양한 옵션을 지정할 수 있습니다.
/**
  * Basic Map
  */
$(document).ready(function(){
 var map = new GMaps({
    el: '#basic_map',
    lat: 51.5073346,
    lng: -0.1276831,
    zoom: 12,
    zoomControl : true,
    zoomControlOpt: {
        style : 'SMALL',
        position: 'TOP_LEFT'
    },
    panControl : false,
  });
});
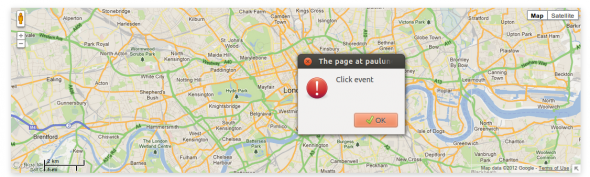
맵 위에 마우스 이벤트
사용자 상호 작용에 대한 지도 응답이 대부분의 애플리케이션에서 실제로 유용 할 수 있기 때문에 GMap.js에 지도에 대한 다양한 마우스 이벤트가 포함되어 있습니다. 이 예제에서는 click 이벤트와 drag 이벤트를 사용하여 화면에 경고를 표시합니다.
<div id="mouse_event_map"></div>
이를 위해 위와 동일한 맵을 사용할 수 있지만 클릭 및 드래그 엔드 이벤트에 대해 다른 옵션이 있습니다. 그런 다음 이러한 다른 이벤트에서 실행할 함수를 할당 할 수 있습니다.
/**
 * Mouse Events on Maps
 */
$(document).ready(function(){
 var map = new GMaps({
    el: '#mouse_event_map',
    lat: 51.5073346,
    lng: -0.1276831,
    zoom: 12,
    zoomControl : true,
    zoomControlOpt: {
        style : 'SMALL',
        position: 'TOP_LEFT'
    },
    panControl : false,
    click: function(e){
      alert('Click event');
    },
    dragend: function(e){
      alert('Drag Event');
    }
  });
});
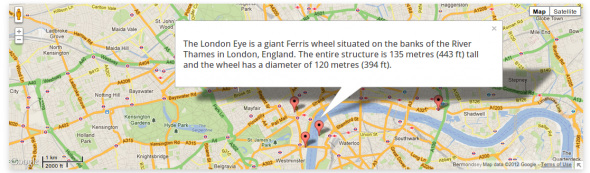
정보와 함께 맵 포인터 만들기
다음으로 살펴볼 기능은 정확한 경도와 위도에서 마커에 포인터를 추가하는 기능입니다. GMap을 사용하면이 기능을 매우 간단하게 만들 수 있으며 마커를 클릭 할 때 표시되는 HTML 정보 상자를 만들 수도 있습니다. HTML은 ID가 있는 div입니다.
<div id="pointers_map"></div>
이 예에서는 런던의 가장 큰 명소 중 일부를 지도에 대한 포인터로 사용하고 있습니다. addMarker () 메소드를 사용하는 것만 큼 쉽게 포인터를 추가 할 수 있습니다.
map.addMarker({
        lat: 51.5007396,
        lng: -0.1245299,
        title: 'Big Ben',
        infoWindow: {
          content: '<p>Big Ben is the nickname for the great bell of the clock at the north end of the Palace of Westminster in London, and often extended to refer to the clock and the clock tower, officially named Elizabeth Tower.</p>'
        }
      });
GMap 클래스에서 반환 된 객체에 이 메서드를 사용합니다.
/**
 * Map Pointers
 */
$(document).ready(function(){
 var map = new GMaps({
    el: '#pointers_map',
    lat: 51.5073346,
    lng: -0.1276831,
    zoom: 13,
    zoomControl : true,
    zoomControlOpt: {
        style : 'SMALL',
        position: 'TOP_LEFT'
    },
    panControl : false,
  });

map.addMarker({
      lat: 51.503324,
      lng: -0.119543,
      title: 'London Eye',
      infoWindow: {
        content: '<p>The London Eye is a giant Ferris wheel situated on the banks of the River Thames in London, England. The entire structure is 135 metres (443 ft) tall and the wheel has a diameter of 120 metres (394 ft).</p>' }
    });

    map.addMarker({
      lat: 51.5007396,
      lng: -0.1245299,
      title: 'Big Ben',
      infoWindow: {
        content: '<p>Big Ben is the nickname for the great bell of the clock at the north end of the Palace of Westminster in London, and often extended to refer to the clock and the clock tower, officially named Elizabeth Tower.</p>'
      }
    });

    map.addMarker({
      lat: 51.518856,
      lng: -0.1263371,
      title: 'British Museum',
      infoWindow: {
        content: '<p>The British Museum is a museum in London dedicated to human history and culture.</p>'
      }
    });

    map.addMarker({
      lat: 51.5085822,
      lng: -0.1283169,
      title: 'National Gallery',
      infoWindow: {
        content: '<p>The National Gallery is an art museum on Trafalgar Square, London. Founded in 1824, it houses a collection of over 2,300 paintings dating from the mid-13th century to 1900.</p>'
      }
    });

    map.addMarker({
      lat: 51.5228316,
      lng: -0.1553503,
      title: 'Madame Tussauds',
      infoWindow: {
        content: '<p>Madame Tussauds is a wax museum in London with branches in a number of major cities.</p>'
      }
    });

    map.addMarker({
      lat: 51.5089465,
      lng: -0.0764269,
      title: 'Tower Of London',
      infoWindow: {
        content: '<p>Her Majesty\'s Royal Palace and Fortress, more commonly known as the Tower of London, is a historic castle on the north bank of the River Thames in central London, England, United Kingdom.</p>'
      }
    });
다음과 같은 Google지도가 생성됩니다.
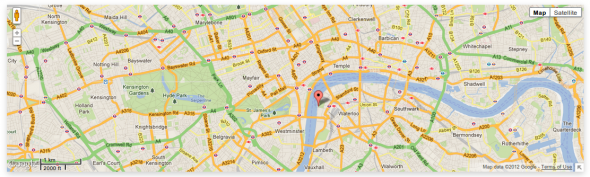
GeoLocation 사용하기
지리적 위치는 브라우저가 정확한 경도와 위도를 찾을 수 있게 해주며, 이는 휴대 기기의 지도에 실제로 유용합니다. 휴대 기기에서 길 찾기를 요청하면 현재 위치에서 길 찾기를 요청할 가능성이 높습니다. GMap.js를 사용하면 객체의 다른 속성을 쉽게 사용하여 위치를 가져와 정확한 위치에 마커를 배치 할 수 있습니다. 먼저 지도 div를 만듭니다.
<div id="geolocation_map"></div>
아래 자바 스크립트를 사용하여 현재 위치에 마커를 만듭니다. 이것은 geolocate ()라는 GMaps 객체의 메소드를 사용합니다.
/**
 * Geolocation
 */
 var map;
$(document).ready(function(){
  var map = new GMaps({
    el: '#geolocation_map',
    lat: 51.5073346,
  lng: -0.1276831,
  });

  GMaps.geolocate({
    success: function(position){
      map.setCenter(position.coords.latitude, position.coords.longitude);

      map.addMarker({
        lat: position.coords.latitude,
        lng: position.coords.longitude,
        title: 'You are here.',
        infoWindow: {
          content: '<p>You are here!</p>'
        }
      });
    },
    error: function(error){
      alert('Geolocation failed: '+error.message);
    },
    not_supported: function(){
      alert("Your browser does not support geolocation");
    }
  });
});
Directions
Geolocation의 이전 예에서 Geolocation을 사용하는 것이 사람들이 길 찾기에 사용하는 데 실제로 유용하여 현재 위치에서 길을 찾을 수있는 방법에 대해 이야기했습니다. GeoMap을 얻고 방향 경로를 그리는 것은 GMaps.js를 사용하는 것이 매우 쉽습니다. 먼저 geolocate 메소드를 사용하여 사용자의 현재 위치를 얻은 다음 drawRoute 메소드를 사용하여 현재 위치에서 목적지까지의 경로를 그립니다.
/**
 * Directions to London
 */
var map;
$(document).ready(function(){
  var map = new GMaps({
    el: '#directions_map',
    lat: 51.5073346,
    lng: -0.1276831,
    zoom:8
  });

  GMaps.geolocate({
    success: function(position){
      map.setCenter(position.coords.latitude, position.coords.longitude);
       map.drawRoute({
        origin: [position.coords.latitude, position.coords.longitude],
        destination: [51.5073346, -0.1276831],
        travelMode: 'driving',
        strokeColor: '#000',
        strokeOpacity: 0.6,
        strokeWeight: 6
      });
    },
    error: function(error){
      alert('Geolocation failed: '+error.message);
    },
    not_supported: function(){
      alert("Your browser does not support geolocation");
    }
  });
});

Static Maps
때때로 페이지에지도를 표시 할 때 사용자가지도와 상호 작용하지 않게하려고, 위치 이미지만 표시하려고 합니다. GMaps.js를 사용하면 플러그인이 모든 위치의 이미지를 표시하도록 할 수 있습니다. 사용하려는 이미지의 크기와 위치를 설정할 수 있으며 div 자리 표시 자와 함께 제공하면됩니다.
/**
 * Static Maps
 */
$(document).ready(function(){
  var url = GMaps.staticMapURL({
    size: [610, 350],
    lat: -33.858290691930996,
    lng: 151.21517658233643
  });
  $('<img/>').attr('src', url).appendTo('#static_map');
});
정리
이 예제 코드에서 알 수 있듯이 페이지에서 GMap을 사용하는 것이 정말 쉽습니다. 다음은 GMap.js 플러그인을 사용하는 방법에 대한 몇 가지 예입니다.
플러그인의 모든 옵션을 사용하는 예는 Github 프로젝트에서 찾을 수 있습니다. GMap 예제 최신 버전의 gmap.js를 다운로드하려면 Github 리포지토리로 이동해야합니다.
'SW > JavaScript' 카테고리의 다른 글
| jQuery, Java Script : 인터랙티브 메트로 스타일 그리드 대시 보드 생성 (0) | 2020.05.25 |
|---|---|
| jQuery : WordPress 관리 영역에서 jQuery 사용하는 방법, 예제 (0) | 2020.05.24 |
| jQuery, JavaScript : Mousetrap.js로 키보드 단축키 처리 : 예제, 구현, 개요 (0) | 2020.05.21 |
| jQuery, Java Script : 자바 스크립트 전체 화면 API : 예제, 구현 (0) | 2020.05.20 |
| 다른 버전의 jQuery 로드하기 : 방법, 예제, 구현, 개요 (0) | 2020.05.19 |