
AOP After Advice
After Advice은 가로 방향 프로그래밍에서 교차 절단을 달성하기 위해 사용됩니다. 메서드 실행 후 Advice이 실행되도록 하는 Advice 유형입니다. @After Annotation을 사용하여 사후 Advice을 구현합니다.
After Advice Example
1단계: Spring Initializr http://start.spring.io을 엽니다.
2단계: 그룹 이름을 입력합니다. 그룹명 com.xxx를 제공하였습니다.
3단계: 아티팩트 ID를 제공합니다.
4단계: 스프링 웹 종속성을 추가합니다.
5단계: Generate 버튼을 클릭합니다. Generate 버튼을 클릭하면 모든 사양을 jar 파일로 감싸고 로컬 시스템에 다운로드합니다.
6단계: 다운로드한 jar 파일의 압축을 풉니다.
7단계: 다음 단계를 사용하여 폴더를 가져옵니다.
파일 -> 가져오기 -> 기존 메이븐 프로젝트 -> 다음 -> 조언 후 예제 -> 완료 폴더를 찾습니다.
8단계: pom.xml 파일을 열고 다음 AOP 종속성을 추가합니다. Spring AOP 및 Aspect J를 통한 Aspect 지향 프로그래밍의 시작점입니다.
<dependency>
<groupId>org.springframework.boot</groupId>
<artifactId>spring-boot-starter-aop</artifactId>
</dependency>
</dependencies>
<project xmlns="http://maven.apache.org/POM/4.0.0" xmlns:xsi="http://www.w3.org/2001/XMLSchema-instance" xsi:schemaLocation="http://maven.apache.org/POM/4.0.0 http://maven.apache.org/xsd/maven-4.0.0.xsd">
<modelVersion>4.0.0</modelVersion>
<groupId>com.xxx</groupId>
<artifactId> aop-after-advice-example</artifactId>
<version>0.0.1-SNAPSHOT</version>
<packaging>jar</packaging>
<name>aop-after-advice-example</name>
    <description>Demo project for Spring Boot</description>
    <parent>
        <groupId>org.springframework.boot</groupId>
        <artifactId>spring-boot-starter-parent</artifactId>
        <version>2.2.2.RELEASE</version>
        <relativePath /> <!-- lookup parent from repository -->
    </parent>
    <properties>
        <project.build.sourceEncoding>UTF-8</project.build.sourceEncoding>
        <project.reporting.outputEncoding>UTF-8</project.reporting.outputEncoding>
        <java.version>1.8</java.version>
    </properties>
    <dependencies>
        <dependency>
            <groupId>org.springframework.boot</groupId>
            <artifactId>spring-boot-starter-web</artifactId>
        </dependency>
    <dependency>
            <groupId>org.springframework.boot</groupId>
            <artifactId>spring-boot-starter-aop</artifactId>
        </dependency>
    </dependencies>

    <build>
        <plugins>
            <plugin>
                <groupId>org.springframework.boot</groupId>
                <artifactId>spring-boot-maven-plugin</artifactId>
            </plugin>
        </plugins>
    </build>
</project>
9단계: AopAfterAdviceExampleApplication.java 파일을 열고 주석 @EnableAspectJAutoProxy를 추가합니다.
@EnableAspectJAutoProxy(proxyTargetClass=true)
AspectJ의 @Aspect 주석으로 표시된 구성요소를 처리할 수 있습니다. @Configuration 주석과 함께 사용됩니다. proxyTargetClass 특성을 사용하여 프록시 유형을 제어할 수 있습니다. 기본값은 false입니다.
package com.xxx;

import org.springframework.boot.SpringApplication;
import org.springframework.boot.autoconfigure.SpringBootApplication;
import org.springframework.context.annotation.EnableAspectJAutoProxy;

@SpringBootApplication
@EnableAspectJAutoProxy(proxyTargetClass = true)
public class AopAfterAdviceExampleApplication {

    public static void main(String[] args) {
        SpringApplication.run(AopAfterAdviceExampleApplication.class, args);
    }
}
10단계: com.xxx.model이라는 이름으로 패키지를 생성합니다.
11단계: com.xxx.model 패키지 아래에 모델 클래스를 만듭니다. Employee라는 이름의 클래스를 만들었습니다. 클래스에서 다음을 정의합니다.
유형 문자열의 세 가지 변수 empId, firstName 및 secondName을 정의합니다.
게터 및 세터를 생성합니다.
기본값을 만듭니다.
package com.xxx.model;

public class Employee {
    private String empId;
    private String firstName;
    private String secondName;

    //default constructor
    public Employee() {}

    public String getEmpId() {
        return empId;
    }

    public void setEmpId(String empId) {
        this.empId = empId;
    }

    public String getFirstName() {
        return firstName;
    }

    public void setFirstName(String firstName) {
        this.firstName = firstName;
    }

    public String getSecondName() {
        return secondName;
    }

    public void setSecondName(String secondName) {
        this.secondName = secondName;
    }
}
12단계: com.xxx.controller라는 이름으로 패키지를 생성합니다.
13단계: com.xxx.controller 패키지 아래에 컨트롤러 클래스를 만듭니다. EmployeeController라는 이름의 클래스를 만들었습니다.
컨트롤러 클래스에서는 직원을 추가하기 위한 매핑과 직원을 제거하기 위한 매핑을 정의했습니다.
package com.xxx.controller;

import org.springframework.beans.factory.annotation.Autowired;
import org.springframework.web.bind.annotation.RequestMapping;
import org.springframework.web.bind.annotation.RequestMethod;
import org.springframework.web.bind.annotation.RequestParam;
import org.springframework.web.bind.annotation.RestController;
import com.javatpoint.model.Employee;
import com.javatpoint.service.EmployeeService;

@RestController
public class EmployeeController {

    @Autowired
    private EmployeeService employeeService;

    @RequestMapping(value = "/add/employee", method = RequestMethod.GET)
    public com.javatpoint.model.Employee addEmployee(@RequestParam("empId") String empId, @RequestParam("firstName") String firstName, @RequestParam("secondName") String secondName) {
        return employeeService.createEmployee(empId, firstName, secondName);
    }

    @RequestMapping(value = "/remove/employee", method = RequestMethod.GET)
    public String removeEmployee(@RequestParam("empId") String empId) {
        employeeService.deleteEmployee(empId);
        return "Employee removed";
    }
}
14단계: com.xxx라는 이름의 패키지를 만듭니다.
15단계: 패키지 com.xxx 아래에 서비스 클래스를 만듭니다. EmployeeService라는 이름의 클래스를 만들었습니다.
서비스 클래스에서는 직원 작성 및 직원 삭제 두 가지 방법을 정의했습니다.
package com.xxx.service;

import org.springframework.stereotype.Service;
import com.javatpoint.model.Employee;

@Service
public class EmployeeService {

    public Employee createEmployee(String empId, String fname, String sname) {
        Employee emp = new Employee();
        emp.setEmpId(empId);
        emp.setFirstName(fname);
        emp.setSecondName(sname);
        return emp;
    }

    public void deleteEmployee(String empId) {}
}
16단계: com.xxx.aspect라는 이름의 패키지를 만듭니다.
17단계: com.xxx.aspect 패키지 아래에 클래스를 만듭니다. EmployeeServiceAspect라는 이름의 클래스를 만들었습니다.
애스펙트 클래스에서는 Advice 후 로직을 정의했습니다.
package com.xxx.aspect;

import org.aspectj.lang.JoinPoint;
import org.aspectj.lang.annotation.Aspect;
import org.aspectj.lang.annotation.After;
import org.springframework.stereotype.Component;

@Aspect
@Component
public class EmployeeServiceAspect {

    @After(value = "execution(* com.javatpoint.service.EmployeeService.*(..)) and args(empId, fname, sname)")
    public void afterAdvice(JoinPoint joinPoint, String empId, String fname, String sname) {
        System.out.println("After method:" + joinPoint.getSignature());
        System.out.println("Creating Employee with first name - " + fname + ", second name - " + sname + " and id - " + empId);
    }
}
위의 클래스에서 다음을 수행합니다.
실행(수식): 그 표현은 Advice이 적용되는 방법입니다.
@After: @After로 주석이 달린 메서드는 포인트 컷 표현식과 일치하는 모든 메서드 후에 실행됩니다.
모든 모듈을 생성한 후 프로젝트 디렉터리는 다음과 같습니다.

모든 모듈을 설치했습니다. 이제 애플리케이션을 실행하겠습니다.
18단계: AopAfterAdviceExampleApplication.java 파일을 열고 Java Application으로 실행합니다.
19단계: 브라우저를 열고 다음 URL을 호출합니다. http://localhost:8080/add/employee?empId={id}&firstName={fname}&secondName={sname}
위의 URL에서 /add/employee는 Controller 클래스에서 만든 매핑입니다. 두 값을 구분하기 위해 두 구분 기호(?)와 (&)를 사용했습니다.

위의 출력에서는 emId 102, firstName=Sachin 및 secondName=Facial을 할당했습니다.
콘솔을 살펴보겠습니다. EmployeeService 클래스의 createEmployee() 메서드를 호출한 후 아래와 같이 EmployeeServiceAspect 클래스의 Advisory() 이후 메서드가 호출됩니다.

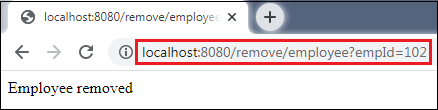
마찬가지로 URL http://localhost:8080/remove/empId=102를 호출하여 직원을 제거할 수도 있습니다. 다음 그림과 같이 Employee removed 메시지를 반환합니다.
'SW > Spring Boot' 카테고리의 다른 글
| Spring Boot : Spring Boot AOP After Returning Advice 개념, 예제, 설명, 개요 (0) | 2023.03.27 |
|---|---|
| Spring Boot : Spring Boot AOP Around Advice 개념, 개요, 설명, 예제 (0) | 2023.03.26 |
| Spring Boot : Spring Boot AOP Before Advice 개념, 예제, 개요, 설명 (0) | 2023.03.24 |
| Spring Boot : Spring Boot AOP 개념, 개요, 설명, 예제 (0) | 2023.03.23 |
| Spring Boot : Tomcat으로 프로젝트 배포 방법, 예제, 개념, 개요 (0) | 2023.03.22 |