
AOP After Returning Advice
Spring AOP에서 조인 포인트 실행이 정상적으로 완료된 후(실행) 호출하는 Advice입니다. 예외가 발생해도 호출되지 않습니다. @AfterReturn Annotation을 이용하여 어플리케이션에서 조언을 반환한 후 구현할 수 있습니다. 주석은 PointCut에서 다루는 메서드 전에 실행할 조언으로 함수를 표시합니다.
조언을 반환한 후 일치하는 메서드를 실행하면 값이 정상적으로 반환됩니다. 반환 속성에 정의하는 이름은 조언 메서드의 매개 변수 이름과 일치해야 합니다. 메서드가 값을 반환하면 해당 값이 해당 인수 값으로 조언 메서드에 전달됩니다.
애플리케이션에 조언을 반환한 후 를 구현합니다.
반환 후 스프링 부트의 예입니다.
1단계: Spring Initializr http://start.spring.io을 엽니다.
2단계: 그룹 이름을 입력합니다. 그룹명 com.javat포인트를 제공하였습니다.
3단계: 아티팩트 ID를 제공합니다. 우리는 Artic Idoop-반품 후 조언-예시를 제공했습니다.
4단계: 스프링 웹 종속성을 추가합니다.
5단계: Generate 버튼을 클릭합니다. Generate 버튼을 클릭하면 모든 사양을 jar 파일로 감싸고 로컬 시스템에 다운로드합니다.
6단계: 다운로드한 jar 파일의 압축을 풉니다.
7단계: 다음 단계를 사용하여 폴더를 가져옵니다.
파일 -> Import -> Existing Maven Projects -> Next -> 반환 후 조언 예제 -> Finish 폴더를 탐색합니다.
8단계: pom.xml 파일을 열고 다음 AOP 종속성을 추가합니다. Spring AOP 및 Aspect J를 통한 Aspect 지향 프로그래밍의 시작점입니다.
<dependency>
<groupId>org.springframework.boot</groupId>
<artifactId>spring-boot-starter-aop</artifactId>
</dependency>
</dependencies>
pom.xml
<?xml version="1.0" encoding="UTF-8"?>
<project xmlns="http://maven.apache.org/POM/4.0.0" xmlns:xsi="http://www.w3.org/2001/XMLSchema-instance"
xsi:schemaLocation="http://maven.apache.org/POM/4.0.0 http://maven.apache.org/xsd/maven-4.0.0.xsd">
<modelVersion>4.0.0</modelVersion>
<groupId>com.xxx</groupId>
<artifactId>aop-after-returning-advice-example</artifactId>
<version>0.0.1-SNAPSHOT</version>
<packaging>jar</packaging>
<name>aop-after-returning-advice-example</name>
<description>Demo project for Spring Boot</description>
<parent>
<groupId>org.springframework.boot</groupId>
<artifactId>spring-boot-starter-parent</artifactId>
<version>2.2.2.RELEASE</version>
<relativePath/> <!-- lookup parent from repository -->
</parent>
<properties>
<project.build.sourceEncoding>UTF-8</project.build.sourceEncoding>
<project.reporting.outputEncoding>UTF-8</project.reporting.outputEncoding>
<java.version>1.8</java.version>
</properties>
<dependencies>
<dependency>
<groupId>org.springframework.boot</groupId>
<artifactId>spring-boot-starter-aop</artifactId>
</dependency>
<dependency>
<groupId>org.springframework.boot</groupId>
<artifactId>spring-boot-starter-test</artifactId>
<scope>test</scope>
</dependency>
</dependencies>
<build>
<plugins>
<plugin>
<groupId>org.springframework.boot</groupId>
<artifactId>spring-boot-maven-plugin</artifactId>
</plugin>
</plugins>
</build>
</project>
9단계: src/main/java 폴더에 com.xxx.model이라는 이름의 패키지를 생성합니다.
10단계: com.xxx.model 패키지에 Account라는 이름의 클래스를 만듭니다.
계정 클래스에서 다음을 수행합니다.
두 개의 변수를 정의했습니다. 계정 번호 및 계정문자열 유형입니다.
파일 -> 소스 -> 필드를 사용하여 생성자를 마우스 오른쪽 버튼으로 클릭합니다.
Getter를 생성합니다.
파일 -> 소스 -> 게터 및 설정자 생성 -> 게터 선택 -> 생성을 마우스 오른쪽 버튼으로 클릭합니다.
toString()을 생성합니다.
파일 -> Source -> Generate to String()을 마우스 오른쪽 버튼으로 클릭합니다.
package com.xxx.model;

public class Account {

    private String accountNumber;
    private String accountType;

    public Account(String accountNumber, String accountType) {
        super();
        this.accountNumber = accountNumber;
        this.accountType = accountType;
    }

    public String getAccountType() {
        return accountType;
    }

    public String getAccountNumber() {
        return accountNumber;
    }

    @Override
    public String toString() {
        return "Account [accountNumber=" + accountNumber + ", accountType=" + accountType + "]";
    }
}
11단계: com.xxx.service.impl라는 이름의 다른 패키지를 만듭니다.
12단계: 이 패키지에서 AccountServiceImpl이라는 이름의 클래스를 만듭니다.
이 클래스에서는 계정 서비스를 정의했습니다.
package com.xxx.service.impl;

import java.util.HashMap;
import java.util.Map;
import java.util.Map.Entry;
import java.util.Set;
import org.springframework.stereotype.Service;
import com.xxx.model.Account;

@Service
public class AccountServiceImpl implements AccountService {

    //storing account detail in the HashMap
    private static Map < String, Account > map = null;
    static {
        map = new HashMap < > ();
        //adding account detail in the map
        map.put("M4546779", new Account("10441117000", "Saving Account"));
        map.put("K2434567", new Account("10863554577", "Current Account"));
    }

    @Override
    public Account getAccountByCustomerId(String customerId) throws Exception {
        if (customerId == null) {
            throw new Exception("Invalid! Customer Id");
        }
        Account account = null;
        Set < Entry < String, Account >> entrySet = map.entrySet();
        for (Entry < String, Account > entry: entrySet) {
            if (entry.getKey().equals(customerId)) {
                account = entry.getValue();
            }
        }
        return account;
    }
}
13단계: com.xxx.service.impl 패키지에 AccountService라는 이름의 인터페이스를 만듭니다.
package com.xxx.service.impl;

import com.xxx.model.Account;

//creating interface that throws exception if the customer id not found
public interface AccountService {
    public abstract Account getAccountByCustomerId(String customerId)
    throws Exception;
}
14단계: com.xxx.aspect라는 이름의 패키지를 만듭니다.
15단계: com.xxx.aspect 패키지에 AccountAspect라는 이름의 클래스를 만듭니다.
@AfterReturn이라는 주석을 사용하여 AfterReturn Advice을 구현했습니다. 또한 ReturningAdvisor() 메서드 이후에 메서드를 정의했습니다.
반환 속성에 정의하는 이름(계정)은 조언 메서드의 매개 변수 이름과 일치해야 합니다.
package com.xxx.aspect;

import org.aspectj.lang.JoinPoint;
import org.aspectj.lang.annotation.AfterReturning;
import org.aspectj.lang.annotation.Aspect;
import org.springframework.stereotype.Component;
import com.javatpoint.model.Account;

@Aspect
@Component
public class AccountAspect {

    //implementing after returning advice
    @AfterReturning(value = "execution(* com.javatpoint.service.impl.AccountServiceImpl.*(..))", returning = "account")
    public void afterReturningAdvice(JoinPoint joinPoint, Account account) {
        System.out.println("After Returing method:" + joinPoint.getSignature());
        System.out.println(account);
    }
}
16단계: AopAfterReturningAdviceExampleApplication.java 파일을 열고 주석 @EnableAspectJAuto Proxy를 추가합니다.
주석을 사용하면 AspectJ의 @Aspect 주석으로 표시된 구성요소를 처리할 수 있습니다. @Configuration 주석과 함께 사용됩니다.
주석 @EnableAspectJAuto Proxy의 proxyTargetClass 특성을 사용했습니다. proxyTargetClass=true 특성을 사용하면 기본 인터페이스 기반 JDK 프록시 접근 방식 대신 CGLIB(Code Generation Library) 프록시를 사용할 수 있습니다.
ConfigurableApplicationContext는 ApplicationContext의 Application Context 클라이언트 메서드와 더불어 Application Context를 구성할 수 있는 기능을 제공하는 인터페이스입니다.
package com.xxx;

import org.springframework.boot.SpringApplication;
import org.springframework.boot.autoconfigure.SpringBootApplication;
import org.springframework.context.ConfigurableApplicationContext;
import org.springframework.context.annotation.EnableAspectJAutoProxy;
import com.xxx.model.Account;
import com.xxx.service.impl.AccountService;
import com.xxx.service.impl.AccountServiceImpl;


@SpringBootApplication
//@EnableAspectJAutoProxy annotation enables support for handling the components marked with @Aspect annotation. It is similar to tag in the xml configuration.
@EnableAspectJAutoProxy(proxyTargetClass = true)
public class AopAfterReturningAdviceExampleApplication {

    public static void main(String[] args) {

        ConfigurableApplicationContext ac = SpringApplication.run(AopAfterReturningAdviceExampleApplication.class, args);
        //Fetching the account object from the application context
        AccountService accountService = ac.getBean("accountServiceImpl", AccountServiceImpl.class);
        Account account;
        try {
            account = accountService.getAccountByCustomerId("K2434567");
            if (account != null)
                System.out.println(account.getAccountNumber() + "\t" + account.getAccountType());
        } catch (Exception e) {
            System.out.println(e.getMessage());
        }
    }
}
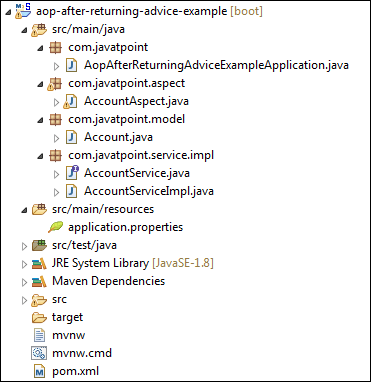
모든 클래스 및 패키지를 생성한 후 프로젝트 디렉터리는 다음과 같습니다.
17단계: AopAfterReturningAdviceExampleApplication.java 파일을 열고 Java Application으로 실행합니다. 아래 그림과 같이 출력이 표시됩니다.

'SW > Spring Boot' 카테고리의 다른 글
| Spring : 환경별 스프링 프로파일 사용을 조심해야 하는 이유 (0) | 2023.06.02 |
|---|---|
| Spring Boot : Spring Boot AOP After Throwing Advice 개념, 예제, 설명, 개요 (0) | 2023.03.28 |
| Spring Boot : Spring Boot AOP Around Advice 개념, 개요, 설명, 예제 (0) | 2023.03.26 |
| Spring Boot : Spring BOot AOP After Advice 개념, 개요, 예제, 설명 (0) | 2023.03.25 |
| Spring Boot : Spring Boot AOP Before Advice 개념, 예제, 개요, 설명 (0) | 2023.03.24 |