과제
"""
[HW3] CIFAR-10 classification
* CIFAR-10 testset 소개
32x32 three color = 3072 dimensions per sample
비행기, 자동차, 새, 고양이, 사슴, 개, 개구리, 말, 배, 트럭의 10가지 클래스로 이뤄져 있으며,
60000개(트레이닝셋 50000 / 테스트셋 10000)의 이미지(클래스당 6000개)를 포함한 데이터셋.

=== HW #3 내용 ===========================================

* 필수사항 (100점)
1. Model Saver 기능 포함 필요
2. Random sample or sample index 지정하여 visualization & 추정결과 plotting (MNIST 과제와 비슷)
3. Testset Accuracy 90% 이상 넘기기

* 도전과제 (20~100점)
1. 직접 찍은 실제 자동차, 고양이, 개 사진 등을 이용하여 테스트 결과 출력 (20점)
참고 자료: 업로드

2. Visualize Filters (20점)
관련 문서: https://hwiyong.tistory.com/35

3. 사람 얼굴 등 새로운 클래스를 인식하도록 만들기 (40점)
관련 문서: https://blog.naver.com/cenodim/220946688251

4. Few-shot learning 등으로 새로운 클래스를 인식하도록 만들기 (3의 hard case) (100점)
관련 문서: ① https://wewinserv.tistory.com/123 ② https://arxiv.org/pdf/1904.05046.pdf

① 해당 논문은 distractor라는 개념을 통해서
새로 들어온 샘플이 새로운 클래스로 분류되어야 하는지 아닌지를 먼저 판단하고,
이를 반영하여 새로운 unknown 클래스로 자동으로 분류하는 모델에 대한 논문입니다.
이 논문을 이해하기 위해서는 clustering(k-means 등) 에 대한 지식이 있어야 합니다.

② few-shot learning 에 대한 survey paper 입니다.
도전과제는 모두 할 필요 없습니다. 중복으로 해도 됩니다. (단, 3과 4는 중복이 안 됩니다.)

* 보고서: 필수사항에서의 결과 및 코드에서의 해당 부분을 표시하여 주시고,
도전과제 결과의 경우 구현 방법에 대한 간략한 설명과 함께 결과를 캡쳐해주시기 바랍니다.
"""
이번에는 위 과제를 수행하게 되었습니다. 이전 MNIST를 통해 서는 법을 배웠으니, 걷는 법을 배우는 느낌입니다. 우선 필수사항과 도전과제 1,2 를 진행하고 도전과제 3, 4는 나누어 진행하기로 했습니다.
단순 CNN 코드
from __future__ import print_function
import keras
from keras.datasets import cifar10
from keras.preprocessing.image import ImageDataGenerator
from keras.models import Sequential
from keras.layers import Dense, Dropout, Activation, Flatten
from keras.layers import Conv2D, MaxPooling2D
import os

batch_size = 32
num_classes = 10
epochs = 100
data_augmentation = True
num_predictions = 20
save_dir = os.path.join(os.getcwd(), 'saved_models')
model_name = 'keras_cifar10_trained_model.h5'

# The data, split between train and test sets:
(x_train, y_train), (x_test, y_test) = cifar10.load_data()
print('x_train shape:', x_train.shape)
print(x_train.shape[0], 'train samples')
print(x_test.shape[0], 'test samples')

# Convert class vectors to binary class matrices.
y_train = keras.utils.to_categorical(y_train, num_classes)
y_test = keras.utils.to_categorical(y_test, num_classes)

model = Sequential()
model.add(Conv2D(32, (3, 3), padding='same',
                 input_shape=x_train.shape[1:]))
model.add(Activation('relu'))
model.add(Conv2D(32, (3, 3)))
model.add(Activation('relu'))
model.add(MaxPooling2D(pool_size=(2, 2)))
model.add(Dropout(0.25))

model.add(Conv2D(64, (3, 3), padding='same'))
model.add(Activation('relu'))
model.add(Conv2D(64, (3, 3)))
model.add(Activation('relu'))
model.add(MaxPooling2D(pool_size=(2, 2)))
model.add(Dropout(0.25))

model.add(Flatten())
model.add(Dense(512))
model.add(Activation('relu'))
model.add(Dropout(0.5))
model.add(Dense(num_classes))
model.add(Activation('softmax'))

# initiate RMSprop optimizer
opt = keras.optimizers.RMSprop(lr=0.0001, decay=1e-6)

# Let's train the model using RMSprop
model.compile(loss='categorical_crossentropy',
              optimizer=opt,
              metrics=['accuracy'])

x_train = x_train.astype('float32')
x_test = x_test.astype('float32')
x_train /= 255
x_test /= 255

if not data_augmentation:
    print('Not using data augmentation.')
    model.fit(x_train, y_train,
              batch_size=batch_size,
              epochs=epochs,
              validation_data=(x_test, y_test),
              shuffle=True)
else:
    print('Using real-time data augmentation.')
    # This will do preprocessing and realtime data augmentation:
    datagen = ImageDataGenerator(
        featurewise_center=False,  # set input mean to 0 over the dataset
        samplewise_center=False,  # set each sample mean to 0
        featurewise_std_normalization=False,  # divide inputs by std of the dataset
        samplewise_std_normalization=False,  # divide each input by its std
        zca_whitening=False,  # apply ZCA whitening
        zca_epsilon=1e-06,  # epsilon for ZCA whitening
        rotation_range=0,  # randomly rotate images in the range (degrees, 0 to 180)
        # randomly shift images horizontally (fraction of total width)
        width_shift_range=0.1,
        # randomly shift images vertically (fraction of total height)
        height_shift_range=0.1,
        shear_range=0.,  # set range for random shear
        zoom_range=0.,  # set range for random zoom
        channel_shift_range=0.,  # set range for random channel shifts
        # set mode for filling points outside the input boundaries
        fill_mode='nearest',
        cval=0.,  # value used for fill_mode = "constant"
        horizontal_flip=True,  # randomly flip images
        vertical_flip=False,  # randomly flip images
        # set rescaling factor (applied before any other transformation)
        rescale=None,
        # set function that will be applied on each input
        preprocessing_function=None,
        # image data format, either "channels_first" or "channels_last"
        data_format=None,
        # fraction of images reserved for validation (strictly between 0 and 1)
        validation_split=0.0)

    # Compute quantities required for feature-wise normalization
    # (std, mean, and principal components if ZCA whitening is applied).
    datagen.fit(x_train)

    # Fit the model on the batches generated by datagen.flow().
    model.fit_generator(datagen.flow(x_train, y_train,
                                     batch_size=batch_size),
                        epochs=epochs,
                        steps_per_epoch=50000,
                        validation_data=(x_test, y_test),
                        workers=4)

# Save model and weights
if not os.path.isdir(save_dir):
    os.makedirs(save_dir)
model_path = os.path.join(save_dir, model_name)
model.save(model_path)
print('Saved trained model at %s ' % model_path)

# Score trained model.
scores = model.evaluate(x_test, y_test, verbose=1)
print('Test loss:', scores[0])
print('Test accuracy:', scores[1])
우선 가장 기본적인 CNN 레이어를 가지고 구현해보았습니다. 케라스에서 제공해주는 예제들이 예전 버전이라 맞지 않은 부분들을 수정하였습니다.
ResNet 기반 코드
from __future__ import print_function
import keras
from keras.layers import Dense, Conv2D, BatchNormalization, Activation
from keras.layers import AveragePooling2D, Input, Flatten
from keras.optimizers import Adam
from keras.callbacks import ModelCheckpoint, LearningRateScheduler
from keras.callbacks import ReduceLROnPlateau
from keras.preprocessing.image import ImageDataGenerator
from keras.regularizers import l2
from keras import backend as K
from keras.models import Model
from keras.datasets import cifar10
import numpy as np
import os

# Training parameters
batch_size = 32  # orig paper trained all networks with batch_size=128
epochs = 200
data_augmentation = True
num_classes = 10

# Subtracting pixel mean improves accuracy
subtract_pixel_mean = True

# Model parameter
# ----------------------------------------------------------------------------
#           |      | 200-epoch | Orig Paper| 200-epoch | Orig Paper| sec/epoch
# Model     |  n   | ResNet v1 | ResNet v1 | ResNet v2 | ResNet v2 | GTX1080Ti
#           |v1(v2)| %Accuracy | %Accuracy | %Accuracy | %Accuracy | v1 (v2)
# ----------------------------------------------------------------------------
# ResNet20  | 3 (2)| 92.16     | 91.25     | -----     | -----     | 35 (---)
# ResNet32  | 5(NA)| 92.46     | 92.49     | NA        | NA        | 50 ( NA)
# ResNet44  | 7(NA)| 92.50     | 92.83     | NA        | NA        | 70 ( NA)
# ResNet56  | 9 (6)| 92.71     | 93.03     | 93.01     | NA        | 90 (100)
# ResNet110 |18(12)| 92.65     | 93.39+-.16| 93.15     | 93.63     | 165(180)
# ResNet164 |27(18)| -----     | 94.07     | -----     | 94.54     | ---(---)
# ResNet1001| (111)| -----     | 92.39     | -----     | 95.08+-.14| ---(---)
# ---------------------------------------------------------------------------
n = 3

# Model version
# Orig paper: version = 1 (ResNet v1), Improved ResNet: version = 2 (ResNet v2)
version = 1

# Computed depth from supplied model parameter n
if version == 1:
    depth = n * 6 + 2
elif version == 2:
    depth = n * 9 + 2

# Model name, depth and version
model_type = 'ResNet%dv%d' % (depth, version)

# Load the CIFAR10 data.
(x_train, y_train), (x_test, y_test) = cifar10.load_data()

# Input image dimensions.
input_shape = x_train.shape[1:]

# Normalize data.
x_train = x_train.astype('float32') / 255
x_test = x_test.astype('float32') / 255

# If subtract pixel mean is enabled
if subtract_pixel_mean:
    x_train_mean = np.mean(x_train, axis=0)
    x_train -= x_train_mean
    x_test -= x_train_mean

print('x_train shape:', x_train.shape)
print(x_train.shape[0], 'train samples')
print(x_test.shape[0], 'test samples')
print('y_train shape:', y_train.shape)

# Convert class vectors to binary class matrices.
y_train = keras.utils.to_categorical(y_train, num_classes)
y_test = keras.utils.to_categorical(y_test, num_classes)


def lr_schedule(epoch):
    """Learning Rate Schedule

    Learning rate is scheduled to be reduced after 80, 120, 160, 180 epochs.
    Called automatically every epoch as part of callbacks during training.

    # Arguments
        epoch (int): The number of epochs

    # Returns
        lr (float32): learning rate
    """
    lr = 1e-3
    if epoch > 180:
        lr *= 0.5e-3
    elif epoch > 160:
        lr *= 1e-3
    elif epoch > 120:
        lr *= 1e-2
    elif epoch > 80:
        lr *= 1e-1
    print('Learning rate: ', lr)
    return lr


def resnet_layer(inputs,
                 num_filters=16,
                 kernel_size=3,
                 strides=1,
                 activation='relu',
                 batch_normalization=True,
                 conv_first=True):
    """2D Convolution-Batch Normalization-Activation stack builder

    # Arguments
        inputs (tensor): input tensor from input image or previous layer
        num_filters (int): Conv2D number of filters
        kernel_size (int): Conv2D square kernel dimensions
        strides (int): Conv2D square stride dimensions
        activation (string): activation name
        batch_normalization (bool): whether to include batch normalization
        conv_first (bool): conv-bn-activation (True) or
            bn-activation-conv (False)

    # Returns
        x (tensor): tensor as input to the next layer
    """
    conv = Conv2D(num_filters,
                  kernel_size=kernel_size,
                  strides=strides,
                  padding='same',
                  kernel_initializer='he_normal',
                  kernel_regularizer=l2(1e-4))

    x = inputs
    if conv_first:
        x = conv(x)
        if batch_normalization:
            x = BatchNormalization()(x)
        if activation is not None:
            x = Activation(activation)(x)
    else:
        if batch_normalization:
            x = BatchNormalization()(x)
        if activation is not None:
            x = Activation(activation)(x)
        x = conv(x)
    return x


def resnet_v1(input_shape, depth, num_classes=10):
    """ResNet Version 1 Model builder [a]

    Stacks of 2 x (3 x 3) Conv2D-BN-ReLU
    Last ReLU is after the shortcut connection.
    At the beginning of each stage, the feature map size is halved (downsampled)
    by a convolutional layer with strides=2, while the number of filters is
    doubled. Within each stage, the layers have the same number filters and the
    same number of filters.
    Features maps sizes:
    stage 0: 32x32, 16
    stage 1: 16x16, 32
    stage 2:  8x8,  64
    The Number of parameters is approx the same as Table 6 of [a]:
    ResNet20 0.27M
    ResNet32 0.46M
    ResNet44 0.66M
    ResNet56 0.85M
    ResNet110 1.7M

    # Arguments
        input_shape (tensor): shape of input image tensor
        depth (int): number of core convolutional layers
        num_classes (int): number of classes (CIFAR10 has 10)

    # Returns
        model (Model): Keras model instance
    """
    if (depth - 2) % 6 != 0:
        raise ValueError('depth should be 6n+2 (eg 20, 32, 44 in [a])')
    # Start model definition.
    num_filters = 16
    num_res_blocks = int((depth - 2) / 6)

    inputs = Input(shape=input_shape)
    x = resnet_layer(inputs=inputs)
    # Instantiate the stack of residual units
    for stack in range(3):
        for res_block in range(num_res_blocks):
            strides = 1
            if stack > 0 and res_block == 0:  # first layer but not first stack
                strides = 2  # downsample
            y = resnet_layer(inputs=x,
                             num_filters=num_filters,
                             strides=strides)
            y = resnet_layer(inputs=y,
                             num_filters=num_filters,
                             activation=None)
            if stack > 0 and res_block == 0:  # first layer but not first stack
                # linear projection residual shortcut connection to match
                # changed dims
                x = resnet_layer(inputs=x,
                                 num_filters=num_filters,
                                 kernel_size=1,
                                 strides=strides,
                                 activation=None,
                                 batch_normalization=False)
            x = keras.layers.add([x, y])
            x = Activation('relu')(x)
        num_filters *= 2

    # Add classifier on top.
    # v1 does not use BN after last shortcut connection-ReLU
    x = AveragePooling2D(pool_size=8)(x)
    y = Flatten()(x)
    outputs = Dense(num_classes,
                    activation='softmax',
                    kernel_initializer='he_normal')(y)

    # Instantiate model.
    model = Model(inputs=inputs, outputs=outputs)
    return model


def resnet_v2(input_shape, depth, num_classes=10):
    """ResNet Version 2 Model builder [b]

    Stacks of (1 x 1)-(3 x 3)-(1 x 1) BN-ReLU-Conv2D or also known as
    bottleneck layer
    First shortcut connection per layer is 1 x 1 Conv2D.
    Second and onwards shortcut connection is identity.
    At the beginning of each stage, the feature map size is halved (downsampled)
    by a convolutional layer with strides=2, while the number of filter maps is
    doubled. Within each stage, the layers have the same number filters and the
    same filter map sizes.
    Features maps sizes:
    conv1  : 32x32,  16
    stage 0: 32x32,  64
    stage 1: 16x16, 128
    stage 2:  8x8,  256

    # Arguments
        input_shape (tensor): shape of input image tensor
        depth (int): number of core convolutional layers
        num_classes (int): number of classes (CIFAR10 has 10)

    # Returns
        model (Model): Keras model instance
    """
    if (depth - 2) % 9 != 0:
        raise ValueError('depth should be 9n+2 (eg 56 or 110 in [b])')
    # Start model definition.
    num_filters_in = 16
    num_res_blocks = int((depth - 2) / 9)

    inputs = Input(shape=input_shape)
    # v2 performs Conv2D with BN-ReLU on input before splitting into 2 paths
    x = resnet_layer(inputs=inputs,
                     num_filters=num_filters_in,
                     conv_first=True)

    # Instantiate the stack of residual units
    for stage in range(3):
        for res_block in range(num_res_blocks):
            activation = 'relu'
            batch_normalization = True
            strides = 1
            if stage == 0:
                num_filters_out = num_filters_in * 4
                if res_block == 0:  # first layer and first stage
                    activation = None
                    batch_normalization = False
            else:
                num_filters_out = num_filters_in * 2
                if res_block == 0:  # first layer but not first stage
                    strides = 2    # downsample

            # bottleneck residual unit
            y = resnet_layer(inputs=x,
                             num_filters=num_filters_in,
                             kernel_size=1,
                             strides=strides,
                             activation=activation,
                             batch_normalization=batch_normalization,
                             conv_first=False)
            y = resnet_layer(inputs=y,
                             num_filters=num_filters_in,
                             conv_first=False)
            y = resnet_layer(inputs=y,
                             num_filters=num_filters_out,
                             kernel_size=1,
                             conv_first=False)
            if res_block == 0:
                # linear projection residual shortcut connection to match
                # changed dims
                x = resnet_layer(inputs=x,
                                 num_filters=num_filters_out,
                                 kernel_size=1,
                                 strides=strides,
                                 activation=None,
                                 batch_normalization=False)
            x = keras.layers.add([x, y])

        num_filters_in = num_filters_out

    # Add classifier on top.
    # v2 has BN-ReLU before Pooling
    x = BatchNormalization()(x)
    x = Activation('relu')(x)
    x = AveragePooling2D(pool_size=8)(x)
    y = Flatten()(x)
    outputs = Dense(num_classes,
                    activation='softmax',
                    kernel_initializer='he_normal')(y)

    # Instantiate model.
    model = Model(inputs=inputs, outputs=outputs)
    return model


if version == 2:
    model = resnet_v2(input_shape=input_shape, depth=depth)
else:
    model = resnet_v1(input_shape=input_shape, depth=depth)

model.compile(loss='categorical_crossentropy',
              optimizer=Adam(lr=lr_schedule(0)),
              metrics=['accuracy'])
model.summary()
print(model_type)

# Prepare model model saving directory.
save_dir = os.path.join(os.getcwd(), 'saved_models')
model_name = 'cifar10_%s_model.{epoch:03d}.h5' % model_type
if not os.path.isdir(save_dir):
    os.makedirs(save_dir)
filepath = os.path.join(save_dir, model_name)

# Prepare callbacks for model saving and for learning rate adjustment.
checkpoint = ModelCheckpoint(filepath=filepath,
                             monitor='val_acc',
                             verbose=1,
                             save_best_only=True)

lr_scheduler = LearningRateScheduler(lr_schedule)

lr_reducer = ReduceLROnPlateau(factor=np.sqrt(0.1),
                               cooldown=0,
                               patience=5,
                               min_lr=0.5e-6)

callbacks = [checkpoint, lr_reducer, lr_scheduler]

# Run training, with or without data augmentation.
if not data_augmentation:
    print('Not using data augmentation.')
    model.fit(x_train, y_train,
              batch_size=batch_size,
              epochs=epochs,
              validation_data=(x_test, y_test),
              shuffle=True,
              callbacks=callbacks)
else:
    print('Using real-time data augmentation.')
    # This will do preprocessing and realtime data augmentation:
    datagen = ImageDataGenerator(
        # set input mean to 0 over the dataset
        featurewise_center=False,
        # set each sample mean to 0
        samplewise_center=False,
        # divide inputs by std of dataset
        featurewise_std_normalization=False,
        # divide each input by its std
        samplewise_std_normalization=False,
        # apply ZCA whitening
        zca_whitening=False,
        # epsilon for ZCA whitening
        zca_epsilon=1e-06,
        # randomly rotate images in the range (deg 0 to 180)
        rotation_range=0,
        # randomly shift images horizontally
        width_shift_range=0.1,
        # randomly shift images vertically
        height_shift_range=0.1,
        # set range for random shear
        shear_range=0.,
        # set range for random zoom
        zoom_range=0.,
        # set range for random channel shifts
        channel_shift_range=0.,
        # set mode for filling points outside the input boundaries
        fill_mode='nearest',
        # value used for fill_mode = "constant"
        cval=0.,
        # randomly flip images
        horizontal_flip=True,
        # randomly flip images
        vertical_flip=False,
        # set rescaling factor (applied before any other transformation)
        rescale=None,
        # set function that will be applied on each input
        preprocessing_function=None,
        # image data format, either "channels_first" or "channels_last"
        data_format=None,
        # fraction of images reserved for validation (strictly between 0 and 1)
        validation_split=0.0)

    # Compute quantities required for featurewise normalization
    # (std, mean, and principal components if ZCA whitening is applied).
    datagen.fit(x_train)

    # Fit the model on the batches generated by datagen.flow().
    model.fit_generator(datagen.flow(x_train, y_train, batch_size=batch_size),
                        validation_data=(x_test, y_test),
                        epochs=epochs, verbose=1, steps_per_epoch=50000,
                        callbacks=callbacks)

# Score trained model.
scores = model.evaluate(x_test, y_test, verbose=1)
print('Test loss:', scores[0])
print('Test accuracy:', scores[1])
그래서 단순한 CNN 레이어를 가지고 90%을 넘기는 것은 쉽지 않았습니다. 그래서 keras에서 제공해주는 ResNet을 활용하여 문제를 해결하였습니다. 90%을 넘기는 수준의 값을 얻을 수 있다는 것을 공식 사이트에서 여러 기준으로 제공해주었습니다.
랜덤한 예제 추출하여 테스트 진행
%matplotlib inline
import math
import matplotlib.pyplot as plt
import random
import numpy as np
from keras.datasets import cifar10
from keras.models import load_model

(x_train, y_train), (x_test, y_test) = cifar10.load_data()
model = load_model('saved_models/cifar10_ResNet20v1_model.014.h5')

# Get one and predict
r = random.randint(0, 10000 - 1)
input_val = x_test[r:r+1]
output_val = model.predict(input_val)

print("Prediction : ", np.argmax(output_val))

# Selected sample showing
plt.imshow(
    input_val.reshape(32, 32,3),
    interpolation='nearest')
plt.show()
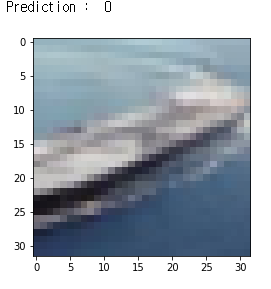
위와 같은 코드를 사용하여, 실제 테스트 이미지를 잘 예측하고 있는지 확인해보았습니다. 아쉽게도 배를 비행기로 예측한 것으로 보이네요. 아무래도 비행기 몸체와 하늘로 해석한 것 같습니다. 하지만 다른 테스트 이미지는 잘 예측하는 것을 확인하였습니다.
실제 나의 이미지 테스트 해보기
from __future__ import print_function
import keras
from keras.layers import Dense, Conv2D, BatchNormalization, Activation
from keras.layers import AveragePooling2D, Input, Flatten
from keras.optimizers import Adam
from keras.callbacks import ModelCheckpoint, LearningRateScheduler
from keras.callbacks import ReduceLROnPlateau
from keras.preprocessing.image import ImageDataGenerator
from keras.regularizers import l2
from keras import backend as K
from keras.models import Model
from keras.datasets import cifar10
import numpy as np
import os

"""
0 : airplane
1 : automobile
2 : bird
3 : cat
4 : deer
5 : dog
6 : frog
7 : horse
8 : ship
9 : truck
"""
import PIL
from PIL import Image
from PIL import *
import os
from array import *
from scipy.misc import *

def rescale_image(image_file):
    print(image_file)
    im = imresize(imread(image_file, 0, 'RGB'), (32, 32, 3))
    return im

def load_and_scale_imgs(img_files):
    imgs = [rescale_image(img_file) for img_file in img_files]
    return np.array(imgs)


model = load_model("saved_models/cifar10_ResNet20v1_model.010.h5")   # This the last model we saved
imgs = load_and_scale_imgs(['my_image/car.png', 'my_image/cat.png', 'my_image/dog.png'])
predictions = model.predict(imgs/255)

print(np.argmax(predictions[0]))
print(np.argmax(predictions[1]))
print(np.argmax(predictions[2]))
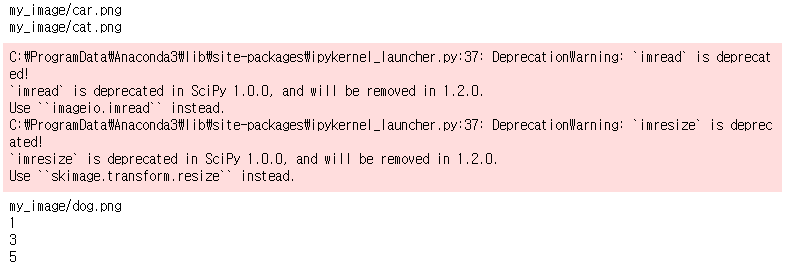
저는 임의의 자동차, 고양이, 개 사진을 input으로 넣어보았습니다. 그리고 해당 예측이 적중한 것을 알 수 있었습니다.
Visualize Filter 적용해보기
def plot_weight(w):
    w_min = np.min(w)
    w_max = np.max(w)

    num_grid = math.ceil(math.sqrt(w.shape[3]))
    fix, axis = plt.subplots(num_grid, num_grid)
    for i, ax in enumerate(axis.flat):
        if 9 < w.shape[3]:
            img = w[:,:,0,i]
            ax.imshow(img, vmin=w_min, vmax=w_max)
        ax.set_xticks([])
        ax.set_yticks([])
    plt.show()


def plot_output(output):
    num_grid = math.ceil(math.sqrt(output.shape[3]))

    fix, axis = plt.subplots(num_grid, num_grid)

    for i, ax in enumerate(axis.flat):
        if i < output.shape[3]:
            img = output[0, :, :, i]
            ax.imshow(img, cmap='binary')
        ax.set_xticks([])
        ax.set_yticks([])
    plt.show()


l1 = model.get_layer('conv2d_43')
w1 = l1.get_weights()[0]
plot_weight(w1)

l2 = model.get_layer('conv2d_62')
w2 = l2.get_weights()[0]
plot_weight(w2)


temp_model = Model(inputs=model.get_layer('conv2d_43').input, output=model.get_layer('conv2d_43').output)
output = temp_model.predict(x_test)
plot_output(output)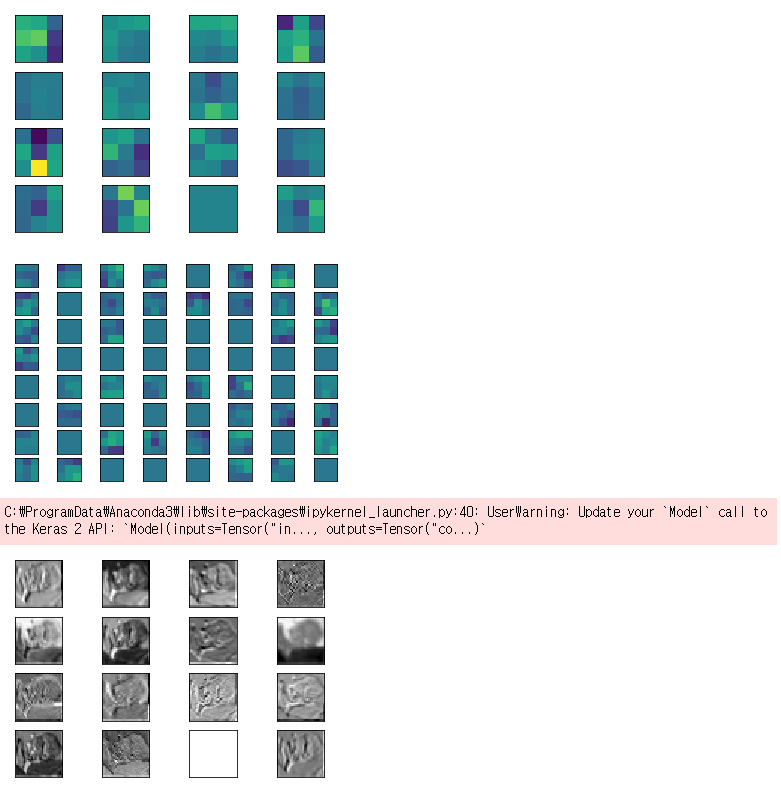
visualize filter를 통해, 여러 레이어들이 어떻게 값을 뽑아내고 있는지 확인해보았습니다. 각 필터들이 어떻게 피쳐들을 뽑아내고 있는지 확인할 수 있었고, 이러한 동작을 통해, CNN을 이해하는데 조금은 도움이 되는 것 같습니다. 이것으로 필수 과제와 도전 과제 1,2 는 충족하였습니다. 남은 기간에는 도전과제 3, 4를 집중 분석하였습니다.
'SW > 영상인식' 카테고리의 다른 글
| 영상인식 : 케라스 : CIFAR10 : TRANSFER LEARNING : 예제 (6) | 2019.11.07 |
|---|---|
| CIFAR10 : 새로운 클래스 인식, 테스트 데이터 구성 : 실습 (5) | 2019.11.04 |
| CIFAR 10 : Few Shot Learning : 새로운 클래스 인식 (1) | 2019.11.02 |
| 내 손글씨를 직접 mnist 모델에 적용하는 방법 (1) | 2019.10.07 |
| MNIST : 손 글씨 : 케라스 : 예제 구현 해보기 (0) | 2019.10.03 |